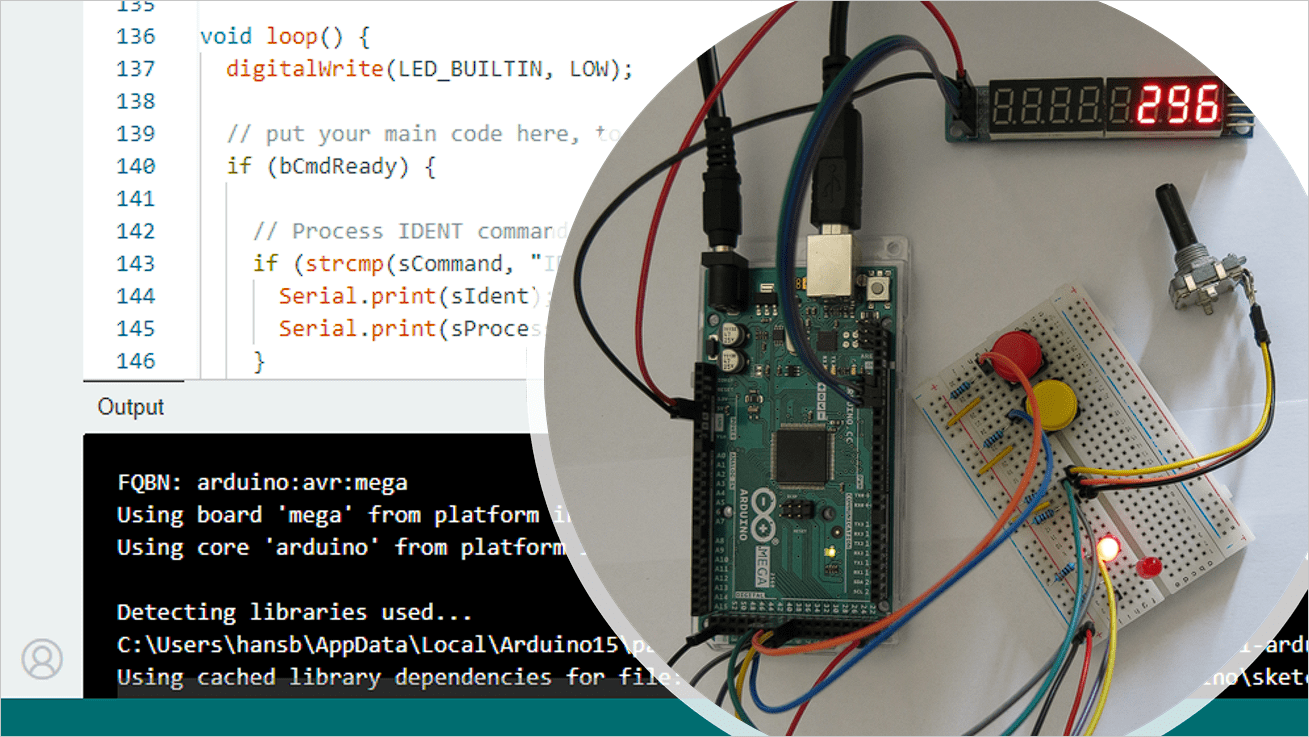
This post is about a mini project in which I will implement some hardware that will connect with MSFS 2020 using an Arduino Mega 2560 and CockpitHardwareHUB_v2. Arduino is probably one of the most accessible microcontroller families that exist. And it is certainly a good start to learn to work with CockpitHardwareHUB_v2. It is also ideal for prototyping. If I want to try something out, whether it is experimenting with some commands, or trying to get some new hardware up and running, I am using Arduino.
Prerequisites
I’m a big fan of the FlyByWire A32NX, which is a free add-on aircraft on MSFS 2020. To run this example, you will need this add-on, because some of the variables I’m using are specifically for that add-on. You can easily install the add-on from the FlyByWire installation page.

You can choose between a Stable version or a Development version. Both will work.
Hardware needed
Below is the hardware I use for this project. I’m using an Arduino Mega 2560, but you could use any board that has at least the same amount of inputs and outputs. But in that case, you will need to change the pin-numbers according to the ones you use on your board.
- 1 x Arduino Mega 2560 (or equivalent)
- 1 x Power Adaptor (strongly recommended to be able to drive all the peripherals)
- Breadboard (I’m using one with 30 rows)
- 1 x 8-digit 7-segment display based on the MAX7219 driver chip
- 2 x push buttons
- 2 x LED’s
- 1 x Rotary Encoder (I’m using a STEC16B04 – Rotary Encoder 24 PPR – from ALPS)
- 3 x wires with male connector to attach to the encoder (I used male/male and soldered one end)
- 4 x resistor 10kOhm
- 2 x resistor 330 Ohm
- 3 x short wire bridges
- 8 x male/male wires
- 5 x male/female wires
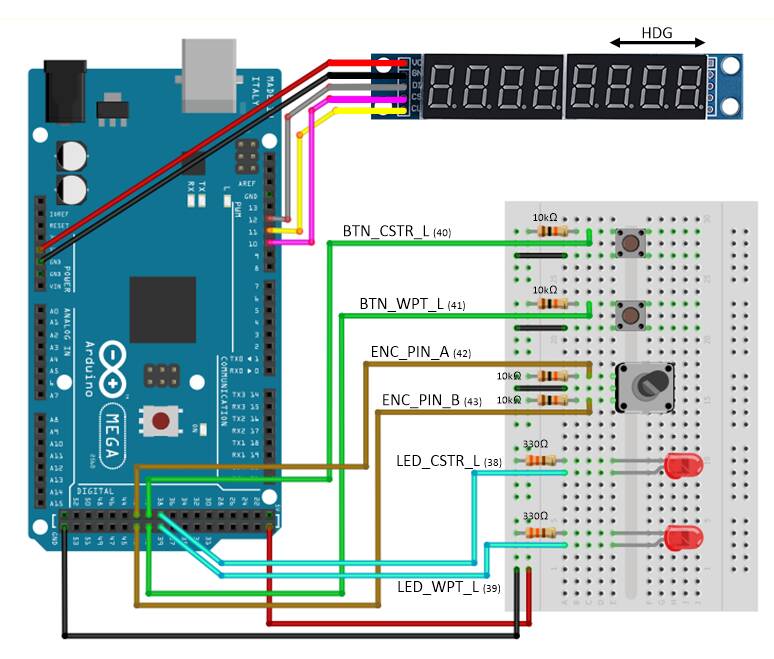
Use the below connection diagram.
Source code on GitHub
The source code of the project can be found in my CockpitHardwareHUB_v2 GitHub repository here.
I’m also using 2 includes in the Arduino sketch. The files can also be found in the repository.
- ButtonClass, which takes care of debouncing the push buttons. You can find more info about debouncing here.
- LedControl, which takes care of driving the MAX7219 based 7-Segment display. This one exists as an official library for Arduino.
Anatomy of the Arduino sketch
The below is the framework of the most basic Arduino sketch that can be used with CockpitHardwareHub_v2. It uses an ident string “TEST Module”, a processor string “ARDUINO”, and adds 4 properties as an example but doesn’t do anything with them yet (just registering).
// Global variables for Serial communication
const long baudrate = 500000;

// IDENT
const String sIdent = "TEST Module\n";
const String sProcessor = "ARDUINO\n";

// Properties (Properties start at 001
const char *Properties[] = {
  "INT32_RW_L:A32NX_EFIS_L_OPTION,enum",                // 001
  "VOID_K:A32NX.FCU_HDG_INC",                           // 002
  "VOID_K:A32NX.FCU_HDG_DEC",                           // 003
  "INT32_R_L:A32NX_AUTOPILOT_HEADING_SELECTED,degrees", // 004
  };
size_t nProperties = sizeof(Properties)/sizeof(Properties[0]);

// Command related items
#define CMD_SIZE 512
char sBuffer[CMD_SIZE];
char sCommand[CMD_SIZE];
char* sParameter;
int iRxPtr = 0;
bool bCmdReady = false;
bool bRegistered = false;

// Acknowledge
#define ACK Serial.print("A\n")

void setup() {
  // Put your initialization code here

  Serial.begin(baudrate, SERIAL_8N1);
  ACK;
}

void loop() {
  if (bCmdReady) {

    // Process IDENT command
    if (strcmp(sCommand, "IDENT") == 0) {
      Serial.print(sIdent);
      Serial.print(sProcessor);
    }

    // Process REGISTER command
    else if (strcmp(sCommand, "REGISTER") == 0) {
      for (int i = 0; i < nProperties; i++)
      {
        Serial.print(Properties[i]);
        Serial.print("\n");
      }
      Serial.print("\n");
      bRegistered = true;
    }

    else if (bRegistered) {
      // Reset bRegistered flag - do not send ACK
      if (strcmp(sCommand, "RESET") == 0)
      {
        bRegistered = false;
      }

      else if ((strlen(sCommand) > 4) && (sCommand[3] == '='))
      {
        // Assumed that "NNN=..." is received

        ACK;

        sCommand[3] = '\0';
        sParameter = &sCommand[4];

        int iID = atoi(sCommand);
        if (iID != 0)
        {
          switch (iID) {
            case 1: // INT32_RW_L:A32NX_EFIS_L_OPTION,enum
            {
              // Process reception of data for READ Property 1
              break;
            }

            case 4: // INT32_R_L:A32NX_AUTOPILOT_HEADING_SELECTED,Degrees
            {
              // Process reception of data for READ Property 4
              break;
            }

            // process more READ properties

            default:
              break;
          }
        }
      }
    }

    bCmdReady = false;
  }

  if (bRegistered) {
    // Process buttons, encoders, switches
    // Send data for WRITE properties
    // Example: Serial.print("002=\n") will INCrease the HDG
  }
}

void serialEvent()
{
  while (Serial.available())
  {
    char cCmd = Serial.read();
    if (cCmd == '\n')
    {
      sBuffer[iRxPtr] = 0;        // terminate string
      strcpy(sCommand, sBuffer);  // copy sBuffer in sCommand
      bCmdReady = true;           // indicate that command is available
      iRxPtr = 0;
    }
    else if (cCmd != '\r')
      sBuffer[iRxPtr++] = cCmd;
  }
}
The above sketch contains the following important blocks of code, that are required to work with CockpitHardwareHUB_v2.
void setup()
// Global variables for Serial communication
const long baudrate = 500000;

void setup() {
  Serial.begin(baudrate, SERIAL_8N1);
  ACK;
}
This runs every time the Arduino is being reset. CockpitHardwareHUB_v2 enables the RTS/DTS when opening the SerialPort, which will normally force the Arduino to do a reset. This means that ‘setup()’ will always be run when connecting with the Arduino.
During setup, the Arduino will open its Serial port, using the baudrate that is defined as a constant (= 500000). After that, it sends an ‘acknowledge-sequence’, which is sending the character “A” followed by a newline character as can be found in the ‘#define’ statement just above. This ACK instructs CockpitHardwareHUB_v2 that it is ready to start receiving commands.
void serialEvent()
// Command related items
#define CMD_SIZE 512
char sBuffer[CMD_SIZE];
char sCommand[CMD_SIZE];
char* sParameter;
int iRxPtr = 0;
bool bCmdReady = false;
bool bRegistered = false;

void serialEvent()
{
  while (Serial.available())
  {
    char cCmd = Serial.read();
    if (cCmd == '\n')
    {
      sBuffer[iRxPtr] = 0;        // terminate string
      strcpy(sCommand, sBuffer);  // copy sBuffer in sCommand
      bCmdReady = true;           // indicate that command is available
      iRxPtr = 0;
    }
    else if (cCmd != '\r')
      sBuffer[iRxPtr++] = cCmd;
  }
}
Let’s first jump at then end of our sketch, and ignore ‘loop()’ for a while. The function ‘serialEvent()’ is called when one or more characters are received via the Serial interface. The while-loop processes each character separately and adds it in ‘sBuffer[]’, until the newline character is received. When this happens, the string is terminated by a 0-character, and the data is copied in the ‘sCommand’ buffer. Making ‘bCmdReady = true’ will trigger ‘loop()’ that a command has been received and is ready for processing.
Be aware that ‘sBuffer’ is not a circular buffer. The ‘iRxPtr’ is being reset each time a command has been received and copied into ‘sCommand’. The length of the buffer is defined by ‘CMD_SIZE’ which is 512. It is very unlikely that the buffer will overrun, but an improvement could be to protect for this.
void loop()
The ‘loop()’ can be split in 2 parts.
- First part is processing a commands received from CockpitHardwareHUB_v2. This is controlled by the ‘bCmdReady’ flag controlled by ‘serialEvent()’.
- Second part is processing all user interactions which are then translated in commands sent to CockpitHardwareHUB_v2. This only happens if a device has successfully been registered.
void loop() {
  if (bCmdReady) {

    // Process commands received from CockpitHardwareHUB_v2

    bCmdReady = false;
  }

  if (bRegistered) {
    // Process buttons, encoders, switches
    // Send data for WRITE properties
    // Example: Serial.print("002=\n") will INCrease the HDG
  }
}
First part of ‘loop()’
Process the IDENT command
    if (strcmp(sCommand, "IDENT") == 0) {
      Serial.print(sIdent);
      Serial.print(sProcessor);
    }
This sends back the Ident and Processor strings.
Process the REGISTER command
    else if (strcmp(sCommand, "REGISTER") == 0) {
      for (int i = 0; i < nProperties; i++)
      {
        Serial.print(Properties[i]);
        Serial.print("\n");
      }
      Serial.print("\n");
      bRegistered = true;
    }
This iterates through all strings in array ‘Properties[]’ and sends them to CockpitHardwareHUB_v2. A final newline indicates that all Properties have been sent.
If successfully registered, process commands
    else if (bRegistered) {
      // Reset bRegistered flag - do not send ACK
      if (strcmp(sCommand, "RESET") == 0)
      {
        bRegistered = false;
      }

      else if ((strlen(sCommand) > 4) && (sCommand[3] == '='))
      {
        // Assumed that "NNN=..." is received

        ACK;

        sCommand[3] = '\0';
        sParameter = &sCommand[4];

        int iID = atoi(sCommand);
        if (iID != 0)
        {
          switch (iID) {
            case 1: // INT32_RW_L:A32NX_EFIS_L_OPTION,enum
            {
              // Process reception of data for READ Property 1
              break;
            }

            case 4: // INT32_R_L:A32NX_AUTOPILOT_HEADING_SELECTED,Degrees
            {
              // Process reception of data for READ Property 4
              break;
            }

            // process more READ properties

            default:
              break;
          }
        }
      }
    }

    bCmdReady = false;
If the special command ‘RESET’ is received, the ‘bRegistered’ flag is reset. This is putting the device in some kind of ‘deaf’ mode, and ignores further commands. This is the exceptional case where no ‘Acknowledge-sequence’ should be sent. This only happens when CockpitHardwareHUB_v2 wants to (re-)register a device.
Else, some parsing is done to check if the command format ‘NNN=[optional data]’ is received. If that is the case, an ‘Acknowledge-sequence’ is sent to indicate to CockpitHardwareHUB_v2 that the command has been successfully received.
A ‘switch/case’ statement is used to process each Read command (you will never receive write commands from CockpitHardwareHUB_v2). Here you see the advantage of using ‘command numbers’ in stead of ‘command strings’. It avoids that time-consuming string comparisons need to be done. This efficient method also allows the use of less performant microcontrollers.
Second part of ‘loop()’
  if (bRegistered) {
    // Process buttons, encoders, switches
    // Send data for WRITE properties
    // Example: Serial.print("002=\n") will INCrease the HDG
  }
This part is doing the processing of user interactions via the hardware connected to the device, and converts it in commands being sent to CockpitHardwareHUB_v2
Final code
The final code as shown in the GitHub repository is implementing the processing of commands and interactions with the hardware and interfaces this with the FlyByWire A32NX.
- Interaction with the 2 push buttons to control the ‘CSTR_L’ and ‘WPT_L’ in the EFIS Left panel
- Update the 2 LED’s showing the current status of ‘CSTR_L’ and ‘WPT_L’ in the EFIS Left panel
- Interaction with the rotary encoder to Increase or Decrease the HDG in the FCU
- Update the last 3 digits of the 7-segment display with the current HDG values on the FCU
For this, the 2 libraries ButtonClass and LedControl are used. The function ‘CheckEncoder()’, together with all the assignments above, are used to deal with the rotary encoder (simplified version of an existing library).